Installation Guidance - Railing Posts With San Francisco Cable Fittings
Overview
Below are instructions for how to install a railing post with San Francisco cable tensioners. The instructions below are in two parts. The first section will walk you through mounting to your surface. The second will go through installing the cable.
Caution: Wear protective ANSI approved safety glass, working gloves and breathing mask all the times.
Tools Needed
Mounting the posts
- Tape
- Power drill
- Bolts or screws (or whatever connecting hardware you are using)
- Wrench
- Level
Installing the cable
- 11mm Wrench
- 6mm Allen Wrench
- 3mm Allen Wrench
- 2.5mm Allen Wrench
- Cable Cutters
Installation Instructions
Part 1: Mounting the posts
*We recommend using bolts instead of screws. Type of connecting hardware differs depending on the surface. Due to the variety of floor surfaces, customers must supply the connecting hardware for the base, i.e., bolts, anchor bolts, etc.
- Lift the Base Cover gently to have enough spec to work and tape it so it doesn’t fall down and is out of the way. Apply the same to all the Posts. Skip this step if your Posts have no Base Cover.
- Adjust all the Posts positions on your surface. Make sure all the posts line up correctly for the cables.
- Mark your drilling points through the base of your posts.
- Remove the posts.
- Perform the guide/spot drilling for the bolts
- Put back the first post.
- Use a level on all sides of the post to ensure the posts are perfectly level.
- Use a wrench to tighten the bolts to your surface.
Note: you may want to tape around the post before using the wrench in order to prevent scratching - Remove the tape from the Base Cover then lower it gently to the base. Skip this step if your Posts have no Base Covers.
- Repeat steps 5 to 9 for all the posts in your project.
Part 2: Installing the cables to the post:
***Install your handrail brackets before the cable. The handrails will provide support to the posts preventing deflection from the cable tensioning. refer to this tipsheet for instructions.
***
-
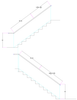
Sip the cable into a cable tensioner until it butts up against the end of tensioner, or just passed the very last hex nut. Mark the end point with a sharpie then pull the cable out. These marking will help you determine where to cut the cable.

-
Run the cable starting from the tensionable side post. Do not connect this side until later on. Do not cut the cable at this point
-
If you have middles posts: Run the cable through the all your middle posts. Do not tighten the middle post cable holders until the last step.
-
Install the cable into the post cable ender side by loosening the 4 hex nuts with your 2.5mm allen wrench, slipping the end of the cable all the way into the ender and retightening the 4 hex nuts
-
Go back to the cable tensioner post then screw out the cable tensioner close to the maximum un-tensionable position.
-
Pull the cable and have another person cut the cable.
-
Align the cable to the cable tensioner then cut the pulled cable using your cable cutters.
-
Slip the cut cable into the cable tensioner and tighten the 4 hex screws with your 2.5mm allen wrench. This will hold the cable. Then, tension the cable by using your 11mm wrench to hold the body of the tensioner, and your 6mm allen wrench to tighten the back.Finally use your 3mm to tighten the lock nut in the back as well. Be careful not to over-tension.It’s very important to tension the cable by twisting the back of the tensioner without letting the front part twist.

Downloads:
Note: A small amount of surface corrosion is not uncommon after a some exposure to weather or salty conditions. We recommend using our passivation solution or some sort of stainless polish to keep any surf corrosion form happening.